Home > Edit Pages > Webpage Add-ons > Form Builder
Form Builder
This add-on allows you to create any type of form for your website. You can create any number of forms and place them on any page you want.
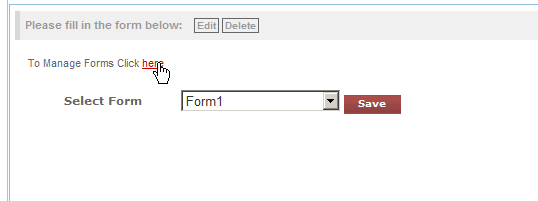
To use the Form-Builder for your website, select the page you wish to add it to and then click on "Form Builder" in the Webpage Add-ons dropdown list. You will see the widget gets added to the first column of the page. Click on "to Manage Form Builder Click Here"

Add in the email address (s) you would like the form submissions to be sent to. For multiple email addresses, use the CC field and spearate with a comma (,) Click on Add New Form

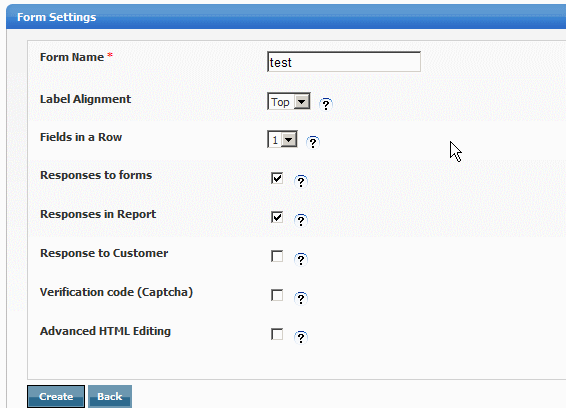
Add in your form settings - form name, alignment, fields in a row
Responses to form - This designates that admin will get form submissions sent to them if checked
Responses in Report - This designates that admin will receive reports in their control panel of all submissions if checked
Response to Customer - This designates that customer will receive an acknowledgement of form receipt if checked
Verification Code (captcha) This creates a code that customer will need to fill in, to prevent spam
Advanced HTML Editing - For users who know HTML, allows you to create custom HTML scripts for your forms
Click "Create"

Click "Add / Edit Questions" to add a new question to your form

Click "Add New Question"

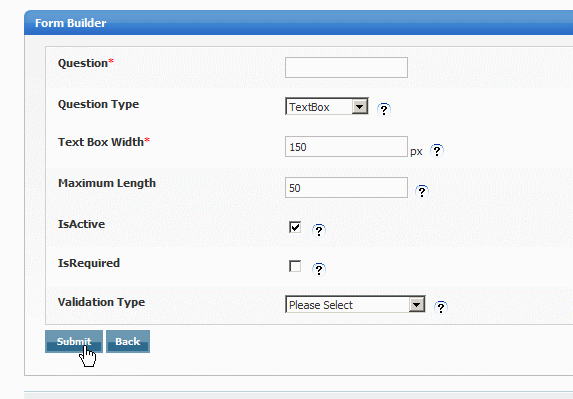
Enter the settings for your question:
Question name
Question Types: Text box - Field will be a text box
Radio Button - Field will show as a radio button, if radio button is selected, new fields will open and you can enter the layout and what the options are for each radio button
Checkbox - Field will show with checkboxes, if checkbox is selected, new fields will open and you can enter the layout and what the options are for each checkbox
Dropdown - Field will show as a dropdown option, if dropdown is selected, new fields will open and you can enter the layout and what the options are for each dropdown
Text Area - Field will show as text area box, if text area is selected, new fields will open and you can enter the width of the box
File Upload - Field will show as an upload box with a Browse button for user to upload a file to you. If file Upload is selected, new fields will open and you can designate which types of file users can upload
Choose whether the field will be active
Choose whether the field will be required / mandatory
Choose validation type - this will designate the message to be displayed to the user when a required field is not filled in. For example, if the question is "Name?" and its not filled in, the validation could be "Please enter your name" Once you choose a validation type, a new field will open up where you will need to enter the validation message
Validation Types: AlphaNumeric Only - Allows Alphanumerics (numbers and letters) and/or a combination of both
Date - Allows Date entry only in the format mm/dd/yyyy
Digits Only - Allows entry of numeric values only
Email - Allows entry of Email ID's only
International Phone Type - Allows entry of International Phone numbers, e.g. +1-999-999-9999
International Zip Type - Allows entry of zip in Alpha-Numeric format
Letters Only - Allows entry of letters only
URL Type - Allows entry of website URL's i.e www.
Zipcode - Allows entry of zip code with numeric format only
Click "Submit" when done
You would continue to enter as many questions as you like for any particular form you are creating
Click "Back to manage forms" when done
Click Return to Website Builder to return to website builder

To add the form to any page on your website, select the form you would like to add from the dropdown and click "Save"

See also


