Home > Payment Processing
Payment Processing
This section is where you enter the details of your payment processor / merchant account, i.e Paypal, Authorize.net, Google Checkout..etc. The payment processor is the company who handles all your store credit card payments. The Shopping cart has built-in the major payment gateways. All you have to do is sign up for a merchant account with any one of these payment processors and then enter your account details in the required fields. To begin, click on the "Payment Processing" link in the left hand navigation of your Shopping Cart:
Currency Setting for Payment Gateway
Some methods of payment can accept transactions (for example, Paypal) in several different currencies. You can select which currency unit you want to use for payments to your store.
All Payment gateways will use the same currency. This will be set to what you enter for the "price" field when you add a new product. For example, if you set USD / US DOLLARS” as currency type,, you will then need to enter product prices in that currency. . Currency conversion rates must be set to 1.0.

If you would like your customers to pay by credit card, follow the points below:
NOTE – You can choose multiple payment methods for your store if you would like to give your customers more Payment options
Choose YES in the first dropdown to enable Credit Card orders:

You will see all Payment Processors open up below that. (Please note -if you want to use Google Checkout, Paypal Standard or Paypal Express) you will do it a little further down, as we have separate fields for these).
PAYPAL ( Paypal Standard,Paypal PRO & Paypal UK)
2CHECKOUT
AUTHORIZE.net
EWAY PAYMENT GATEWAY
QBMS (QUICKBOOKS MERCHANT PROCESSING)
GOOGLE CHECKOUT
PAYPAL EXPRESS CHECKOUT
You will also see an option to choose which credit cards you would like to accept. NOTE - please ensure your Payment Processor allows you to accept the credit cards you choose here
Setting up your Merchant Account. You can choose any of the below Merchants to be your processor
PAYPAL PRO
Note: PayPal Website Payment Pro can be used with a “PayPal Business account” or a “PayPal Premium account” only. The difference between Paypal Pro and Paypal Standard is that with Paypal Pro, customers will stay on your website when placing an order. Paypal Standard is when customers will be re-directed to the Paypal website to complete their order and submit payment to you
To use Paypal Pro, select it from the Radio Button provided. Here are the required details you will need to enter into the shopping cart admin area once you have signed up for PayPal Website Payment Pro.
• Username: PayPal API User Name.
• Password: PayPal API Password.
• Signature: API Signature.
To obtain a PayPal Pro account, please visit https://www.paypal.com/us/cgi-bin/?&cmd=_wp-pro-overview-outside and apply for a Website Payments Pro account. After you have applied, you can log in to PayPal merchant interface to request the API Signature.
To Request API Signature:
To receive an API signature, you must have a PayPal Business or Premier Account
and applied for Website Payment Pro.
1) Login into your existing PayPal Account, or create a new
one
2) Click on the Profile tab in the My Account sub-menu to start:

3) Under Profile Summary, click "API Access"

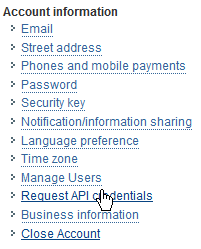
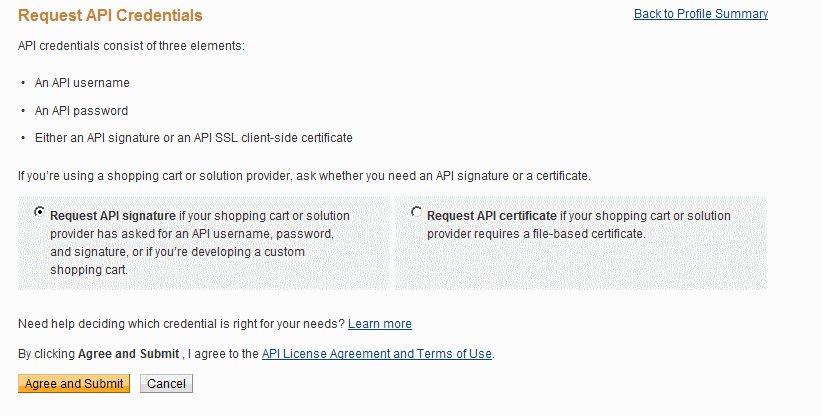
4) Click "Request API Credentials" and "Agree and Submit" to move to the next step:

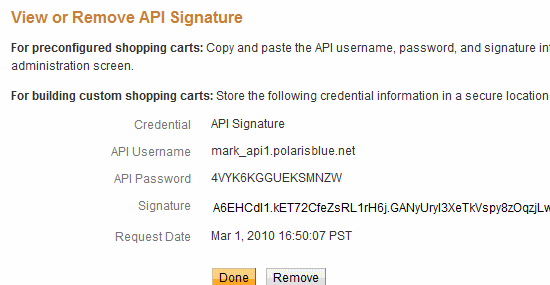
5) You will see your API username, API Password and Signature on the next screen

6) Enter your API username, API Password and Signature into the fields provided. Select your environment as "live" to accept live Credit Card Orders, or "Sandbox" to run test orders first.

PAYPALPRO UK
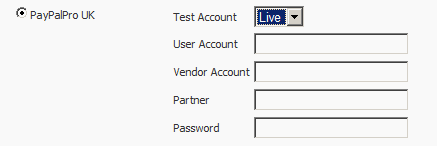
Here are the required details you will need to enter into the shopping cart admin area once you have signed up for PayPal Website PaymentProUK
• Test Account: this can be set to “Test” or “Live” depending on what type of account you require.
• User Account: This is the merchant account number that you will receive from Paypal after you have successfully applied for a Paypal Pro Account
• Vendor Account: This is the same as the "User Account"
• Partner: Paypal will send you these details after you have successfully applied for a Paypal Pro Account
• Password: This is a code that will be you will find in your account area in PayPal

2CHECKOUT
You will need to enter the “Merchant Account” number which is issued by 2Checkout. You can apply for an account at: http://www.2checkout.com

Also, you will need to set a notification URL in your merchant account.
1) Log in to 2Checkout account and click on the "Vendor Login" button
2) Click on the "Look & Feel" button.
3) Apply the setting “Direct Return” to “No”.
4) In the “Approved URL”, enter
https://www.YourDomain.com/Gateway/TwoCheckoutNotification.aspx, where
“YourDomain.com” is the domain name of your website.
Note: We suggest you use SSL for the URL that has been approved.
AUTHORIZE.NET
After you have signed-up for an Authorize.net account, follow the steps below for the credentials you need to enter into your shopping cart backend
• Login ID: API login ID for for your gateway account
• Transaction Key: Transaction key from Authorize.net control panel
• Test Mode: You can set to test mode if you would like to test transactions before going live.

You will need to sign-up for an Authorize.net account first to get these settings.
To Sign up for a Authorize.net account, download the attachment: Authorize Net Application 11282.pdf and fax it to 801-492-6546 Attn. Brad
Through an agreement with , you will be able to get good competitive rates.
Brad Diamond's contact info:
Brad Diamond
Authorize.Net Inside Sales Coordinator
Tel. 801-492-6540
bdiamond@authorize.net
www.authorize.net
or you can go to www.authorize.net and sign-up for an account
Once you have signed up for an account, log into the Merchant Interface at www.authorize.net.
Select ‘Settings’ from the Main Menu.
Click ‘API Login ID and Transaction Key’ from the Security Settings section.
Note: RequIf you request a new transaction key, that will disable your old transaction fee.
1) Log in to the Merchant Interface at Authorize.net
2) Click ‘Settings’ from your main menu adminstration area
3) Click ‘Direct Response’ in the Transaction Response area
• Set the Delimited Response to ‘No’
• The the Default Delimited Separator, select “| (pipe)”.
• For the Field Encapsulation Character, you want to select the blank value.
EWAY PAYMENT
This payment method is for Members based in Australia. To sign-up with this company, please go to http://www.eway.com.au/default.aspx
Here are the required details you will need to enter into the shopping cart admin area once you have signed up for Eway:
• Customer ID: This is the value ID when you login to your Eway Merchant account
• Use CVN: Choose “Yes” to display and require CVV number credit card. Select
“No” to hide the text box to enter CVV number from your customers
• Test Mode: You can set to test mode if you would like to test transactions before going live.
• Return Error Code( for testing ): This is a specific error code only for testing reasons. It will only be active if you have your account set to "test mode"
You can find a list of error codes here: http://www.eway.com.au/Support/Downloads/ResponseCodes.aspx

QBMS (QUICKBOOKS MERCHANT SERVICE)
This is Quickbooks Merchant Gateway Account. You would need to first apply for a QMBS account here: http://payments.intuit.com/
To view a step by step process of how to sign up for a Quickbooks Merchant Service account, please click: Quick Books Merchant Service Setup.pdf
Here are the required details you will need to enter into the shopping cart admin area once you have signed up for a QBMS account
• App ID: This value will be a number, ie. 456789
• App Login: This will be URL string i.e. merchantstore.mydomain.com.
• Connection Ticket: This will be a URL strong, e.g. Fcw-14-1lSEBw13FFsl.
• Mode: This can be set to either to be a test or live account

PAYPAL WEBSITE PAYPAL STANDARD (PAYPAL STANDARD)
This option is the simplest as it just requires you have a simple paypal account and enter your email address. When a customer clicks BUY NOW on your website, it will take them through checkout to the PAYPAL site where they would complete their transaction and be returned to your website when completed. To use this option
a) if you don’t already have a PAYPAL account, go to: https://www.paypal.com/us/cgi-bin/?&cmd=_wp-standard-overview-outside and create your account.
b) Choose YES in the dropdown menu to enable Paypal Standard, then enter your email address you used to sign up for your Paypal account into the field provided. Make sure the Sandbox Environment (Testing) is set to NO to allow for live payments. If you would like to test this before taking it live, choose YES in the testing dropdown menu.

PAYPAL EXPRESS CHECKOUT
For Paypal Express Checkout, the customer chooses Express Checkout by clicking the Paypal Button and
- Logs into PayPal to authenticate his or her identity
- Reviews the transaction on PayPal
- Confirms the order and pays from your site
- Receives an order confirmation
PayPal Express Checkout shares the same account credentials as PayPal Website Payment Pro.
Please see PayPal Website Payment Pro above for setting up this account
Here are the required details you will need to enter into the shopping cart admin area once you have signed up for a Paypal Pro Account
• Username: PayPal API Username.
• Password: PayPal API Password.
• Signature: API Signature.
• Environment: Choose "Sandbox" for a test account. Or, "Live" for a production account.

GOOGLE CHECKOUT
The Shopping Cart is integrated with Google Checkout

Applying for a Google checkout Account:
• You can apply for a test account by going here: http://sandbox.google.com/checkout/sell/
• You can apply for a live account by going here:http://www.google.com/checkout/
Here are the few steps which you have to follow in order for working of above functionality.
If you are using a Sandbox account, you can change Step 1) to log in to sandbox merchant website instead (at http://sandbox.google.com/checkout/sell/ ).
You will need to set Google Checkout Notification as follows:
Step 1: Log in with a merchant account at http://checkout.google.com.
Step 2: Click on the"Settings" link from the top menu bar
Step 3: Click "Integration" from the left menu bar
Step 4: In "API Callback URL" box, enter the Call back URL which can be viewed in thePayment Configuration page under the google checkout section.
Step 5: Select "XML" as the Callback method.
Note: Currently, Google Checkout will not work with Real-Time Shipping, such as FedEx or UPS.
Once Call Back URL is successfully set then you will be able view the orders in your Shopping Cart Admin. But you can always view your orders in Google Checkout website once you login: (http://checkout.google.com).
See also


